A successful Pilates studio layout is not simply the arrangement that fits the greatest number of reformers. It must support the class model, client experience, instructor movement, equipment adjustments, cleaning, storage and future operation.
Start with the services the studio will sell, then convert the premises into functional zones and complete equipment stations. This sequence prevents a common planning mistake: filling a floor plan with equipment footprints before accounting for the people and activities around them.
This guide provides a practical planning method for new studios and renovations. It does not prescribe universal clearances. Final decisions must reflect the selected equipment, teaching method, building conditions, accessibility needs and applicable local requirements.
Start with the studio operating model
The floor plan should follow the business and teaching model. Before drawing equipment, define:
- private, semi-private and group services;
- expected class size;
- types of Pilates equipment used;
- instructor-to-client ratio;
- peak arrival and departure patterns;
- client profile and accessibility needs;
- staffing, cleaning and maintenance routines;
- planned expansion.
A group reformer studio needs consistent stations and clear instructor sightlines. A private studio may benefit from flexible open space and a broader equipment mix. A rehabilitation-oriented facility may need different access, privacy and support arrangements reviewed by qualified professionals.
Do not design for an unrealistic maximum class size. Use the number the team can teach safely and consistently while delivering the intended client experience.
Separate total premises area from usable training area
The leased or purchased floor area is not the same as the space available for equipment.
Begin with the total premises area, then identify space occupied by:
- entrance and reception;
- waiting and retail displays;
- toilets and changing areas;
- office or consultation space;
- staff facilities;
- storage and cleaning supplies;
- walls, columns and fixed cabinets;
- mechanical or utility areas;
- corridors and required exit routes.
The area remaining for instruction is the usable training area. Even within that area, not every square meter can become an equipment station. Doors, instructor paths, client access and exercise movement must remain workable.
Use this planning relationship:
Usable training area = total premises area - non-training functions - fixed obstructions
Then test how many complete stations fit. Do not divide the room by a generic square-meter allowance because reformer dimensions, tower configurations and teaching methods vary.
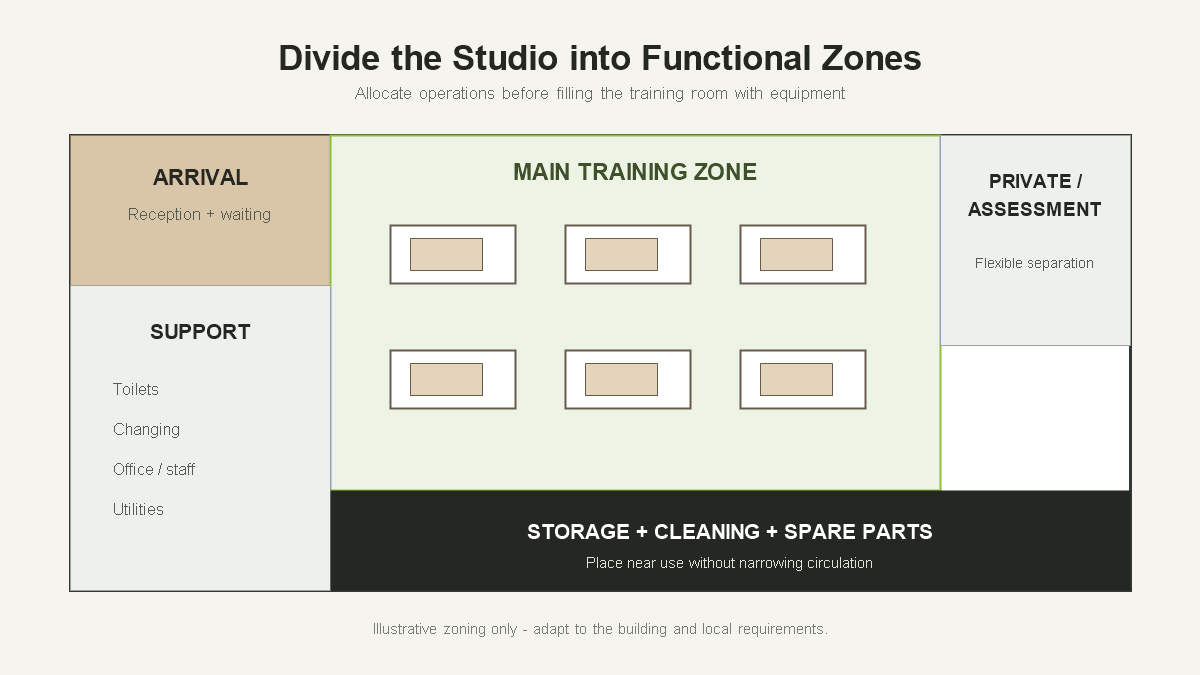
Create functional zones before placing equipment
Divide the studio into zones that reflect the client journey and daily workflow.
Arrival and reception
Plan where clients enter, check in, wait and store personal items. Avoid directing arriving clients through an active class. The reception position should allow staff to see the entrance without interrupting instruction.
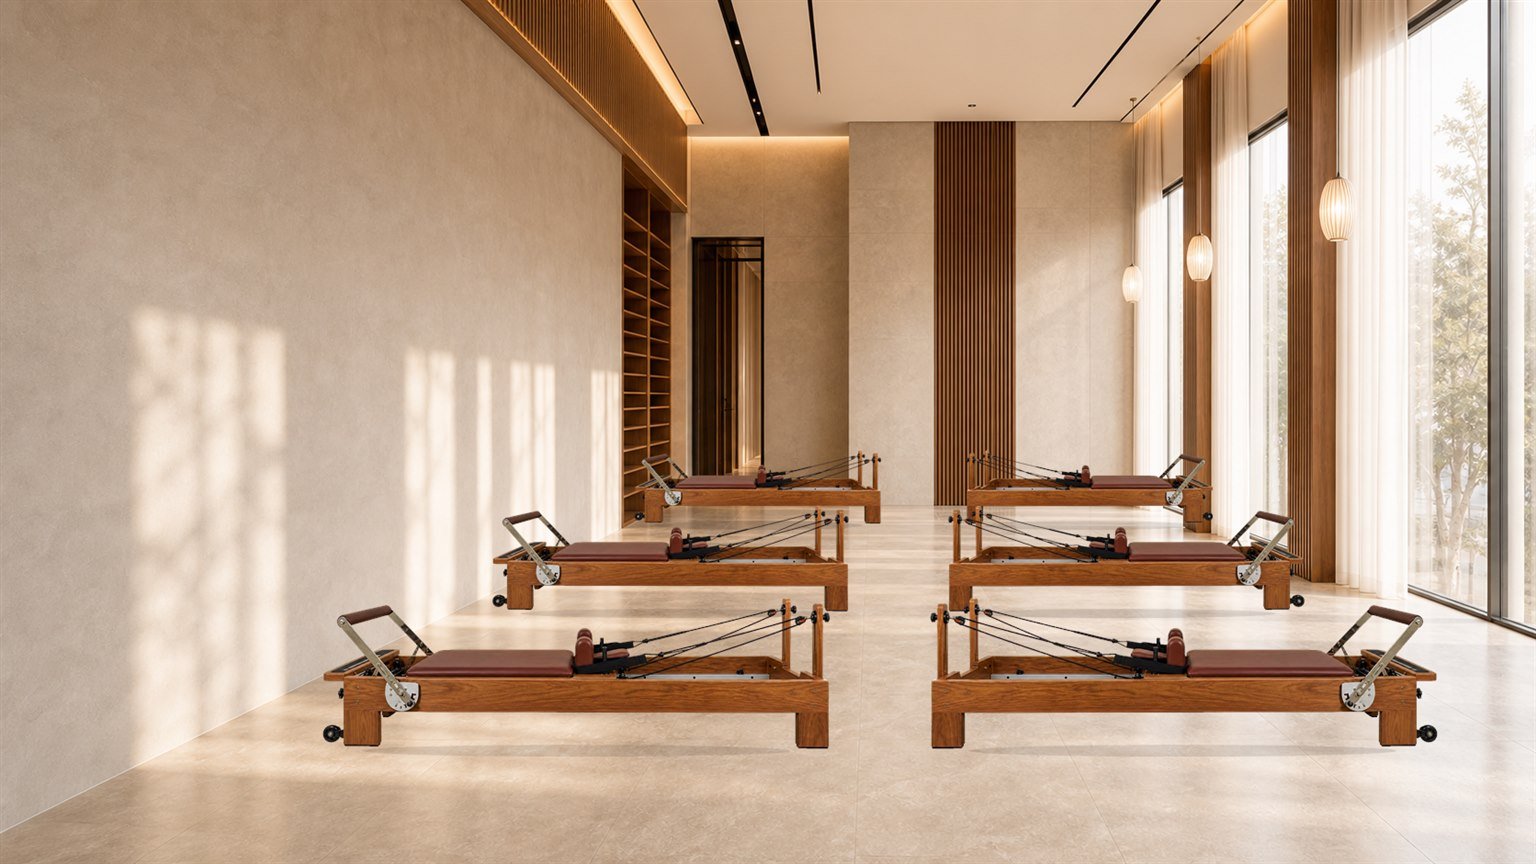
Main training zone
This is the primary equipment area. It should support the intended class format, instructor movement, equipment adjustments and a clear path between entrance and stations.
Private or assessment zone
If the service model includes consultations, assessments or private sessions, decide whether they require visual or acoustic separation. A movable screen may provide flexibility, while a permanent room changes circulation and usable area.
Equipment and accessory storage
Boxes, jump boards, poles, mats, rings and cleaning supplies require planned storage. Storage should be near the point of use but should not narrow paths or block access to equipment.
Support areas
Toilets, changing areas, office functions and staff storage should be included at the beginning of the plan, not added after the training room has been filled.
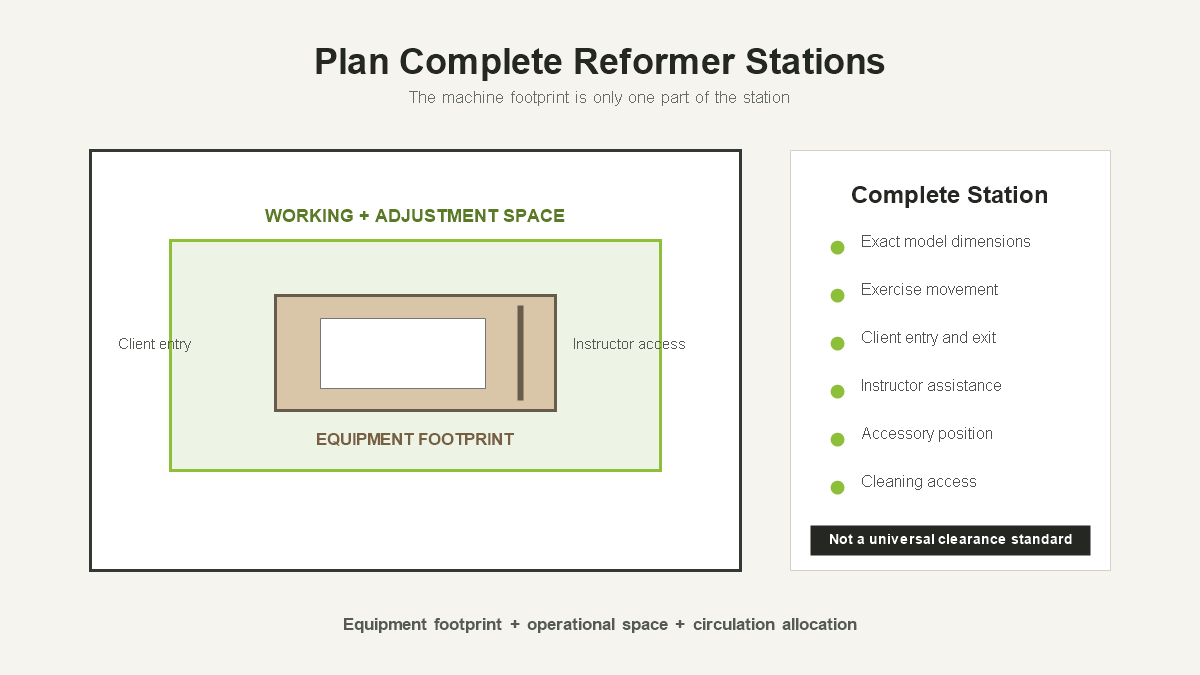
Plan complete reformer stations
An equipment footprint is only the physical outline of the reformer. A complete station also includes the space required to enter, adjust and use it within the studio’s teaching method.
For each shortlisted model, obtain:
- exact overall length, width and height;
- carriage and standing-platform dimensions;
- footbar and rope positions;
- tower height and working range when applicable;
- space needed for boxes, jump boards and other accessories;
- moving or storage instructions;
- access needed for cleaning and maintenance.
Draw the exact model to scale. Then add the operational space required for client entry, instructor assistance, adjustments and the exercises included in the program.
Complete station = equipment footprint + working space + circulation allocation
This is a planning framework, not a universal safety standard. Verify the final station with the equipment supplier, teaching team and relevant local professionals.
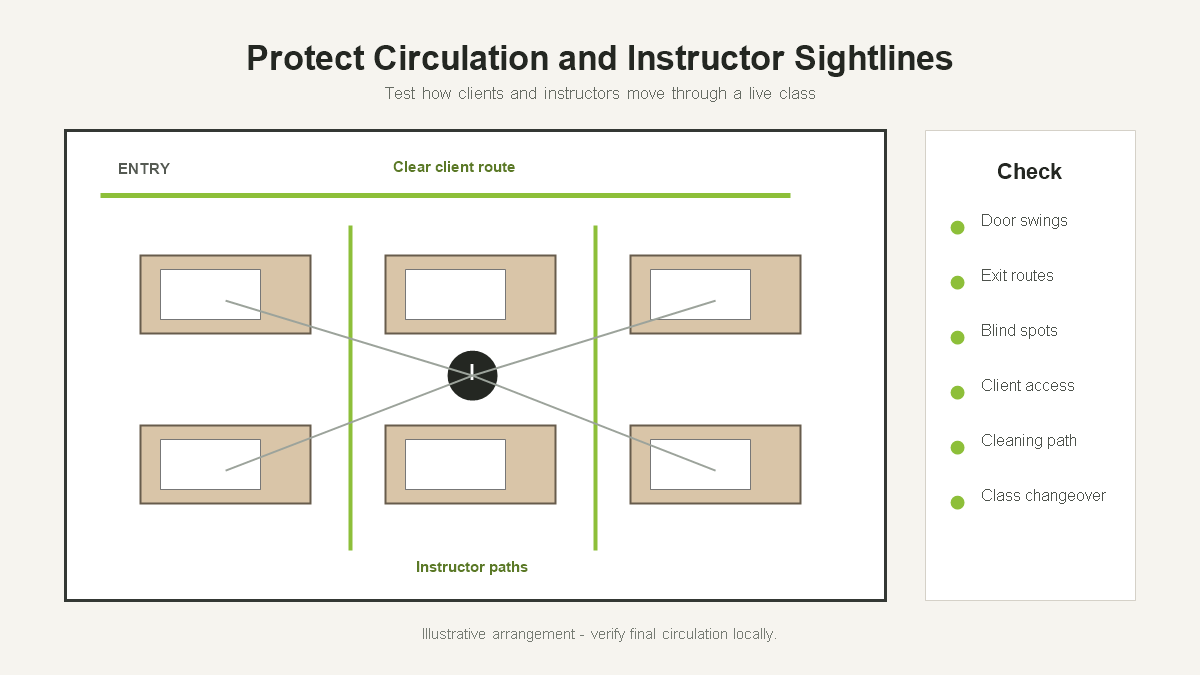
Protect circulation, doors and instructor sightlines
People should be able to enter, leave and move through the studio without stepping over equipment or accessories.
Review:
- the path from reception to the training room;
- client access to every station;
- instructor movement between stations;
- door swings and exit routes;
- access to toilets, changing and storage;
- cleaning and maintenance access;
- transitions between consecutive classes.
Instructor sightlines are especially important in group sessions. Test whether the instructor can observe all clients from likely teaching positions and whether columns, towers or room divisions create blind spots.
Avoid long rows that leave the instructor unable to reach the middle stations efficiently. In wider rooms, a center aisle or smaller station groups may improve access. The best arrangement depends on room geometry and class delivery.
Plan storage as part of the layout
Unplanned accessories quickly occupy walls, corners and circulation paths. Create an inventory before choosing storage:
- sitting boxes;
- jump boards;
- platform extenders;
- poles and dowels;
- straps and handles;
- mats and small props;
- cleaning supplies;
- spare ropes, springs and other wear parts.
Separate frequently used accessories from maintenance stock. Daily items should be easy for instructors to reach and return. Spare parts and cleaning chemicals may require controlled staff storage.
Check whether accessories can be stored without damaging upholstery or finishes. If boxes or boards are stored vertically, provide stable supports and follow manufacturer guidance.
Match the equipment mix to the service menu
The studio does not necessarily need to use all of its training area for identical reformers.
Group reformer studio
Prioritize consistent reformer configurations, predictable adjustments and a layout that supports synchronized teaching. Include enough storage for every accessory used in the class program.
Private and semi-private studio
A smaller number of reformers may be combined with a Cadillac or trapeze table, chair, ladder barrel or open mat area. Flexible circulation can be more valuable than maximum station count.
Clinical or rehabilitation-oriented facility
Equipment selection and room planning should be reviewed according to the facility’s services, client needs and applicable professional requirements. Access height, assistance space and privacy may carry greater importance.
Multipurpose studio
If equipment moves between classes, verify wheel systems, safe moving procedures, storage positions and setup time. Do not assume a reformer can be stored vertically unless the exact model is designed for it.
Consider floors, lighting, acoustics and utilities
The equipment plan interacts with the room itself.
Flooring
The floor should be level, stable and compatible with the equipment feet or leveling system. Review cleaning, grip, noise transmission and protection from equipment movement.
Lighting
Use comfortable, even lighting that allows instructors to observe alignment without glare. Consider how daylight changes throughout the day and whether mirrors amplify direct light.
Acoustics
Hard surfaces and open rooms can increase reverberation. Acoustic treatment may improve verbal instruction, but it should be coordinated with cleaning, fire and building requirements.
Ventilation and temperature
Plan for class occupancy, local climate and the building system. Avoid placing equipment where vents create uncomfortable direct airflow.
Power and technology
Identify power, network, audio and check-in requirements before fixing reception, retail or instructor positions. Loose cables should not cross training or circulation areas.
Test the plan at scale
A scaled plan reveals conflicts that are easy to miss in a written equipment list.
Use architectural drawings where available and verify critical dimensions on site. Mark:
- walls, columns and changes in floor level;
- doors and their swing direction;
- windows, radiators, vents and utility points;
- fixed cabinets and counters;
- every equipment footprint;
- operational space around each station;
- circulation and instructor paths;
- storage footprints;
- reception and waiting functions.
Create at least two alternatives. One may prioritize class capacity; another may provide more flexibility, privacy or storage. Compare them against the actual service model rather than selecting the layout with the most equipment.
Before ordering, use tape or temporary markers to outline equipment and important paths in the room when possible. Ask instructors to walk through client arrival, class setup, teaching, accessory changes, cleaning and departure.
Worked planning example
Consider a hypothetical studio with a total area of 120 m2 / approximately 1,292 sq ft.
The owner allocates:
55 m2 / approximately 592 sq ftto reception, toilets, office, storage and other functions;65 m2 / approximately 700 sq ftas usable reformer training area.
The target class size is seven clients. The owner is considering eight reformers: seven active stations and one operational spare.
The designer draws the selected reformer to scale, adds the studio’s operational space and checks doors, instructor paths and accessory storage. The plan confirms whether eight complete stations fit without treating the full room as divisible equipment area.
This example is not a universal area-per-reformer recommendation. A different model, tower configuration, room geometry or class method can produce a different result.
Plan for opening day and future expansion
A layout should work when the studio opens and remain manageable as demand grows.
Consider:
- whether additional stations can be added without reducing necessary circulation;
- whether electrical, storage or reception capacity supports growth;
- whether future equipment can match the original configuration;
- where unpacking and assembly will occur;
- delivery access, lifts, stairs and door dimensions;
- how damaged packaging will be removed;
- where spare parts and maintenance tools will be stored.
If the room cannot support the full long-term class model, consider a phased equipment purchase rather than overcrowding the opening layout.

Pilates studio layout checklist
Before approving the plan, confirm:
- The service menu and practical class size are defined.
- Non-training areas and fixed obstructions are deducted.
- Exact dimensions are available for every selected model.
- Complete stations include working and circulation space.
- Clients and instructors can reach every station.
- Doors and required routes remain unobstructed.
- Instructor sightlines have been tested.
- Accessories and cleaning supplies have assigned storage.
- Flooring, lighting, acoustics and ventilation are reviewed.
- Delivery and assembly access are confirmed.
- The layout has been tested at scale and on site where possible.
- Qualified local professionals have reviewed applicable requirements.
How VTreformer supports studio planning
VTreformer supplies commercial Pilates equipment for studios, gyms, rehabilitation facilities, hospitality projects and training academies. Available reformer options include beech, oak and aluminum frames, with studio, clinical and home configurations.
Buyers can request model dimensions, configuration choices, accessory lists, packaging information and warranty details for planning. The minimum order quantity starts from one set, allowing studios to test a configuration or purchase in phases.
Current warranty terms include 10 years for frames, three years for springs and one year for wear parts. VTreformer also provides lifetime spare-parts support at factory-direct pricing.
Planning a new Pilates studio or renovation?
Share your usable training area, floor plan, target class size, preferred equipment, quantity range, destination and opening date. Find the Right Equipment for your studio plan.
Frequently asked questions
How much space does a Pilates reformer studio need?
There is no universal area that fits every studio. Begin with the exact dimensions of the selected reformer, subtract non-training functions and add the working and circulation space required by the class format and local requirements.
How should reformers be arranged in a studio?
Arrange complete stations so clients and instructors can access each machine, doors and routes remain clear, and the instructor can observe the class. Rows, a center aisle or smaller groups may work depending on room geometry.
What rooms should a Pilates studio include?
The answer depends on the service model and local requirements. Common functions include reception, waiting, training, storage, toilets, changing, consultation or private instruction, office and staff support.
Where should Pilates accessories be stored?
Store daily accessories near the training area without narrowing paths. Keep cleaning supplies, maintenance tools and spare parts in suitable staff-controlled storage.
Should a studio buy equipment before finalizing the layout?
Shortlist equipment early, but obtain exact model dimensions and test a scaled layout before confirming the order. Product dimensions, towers and accessories can materially change capacity.
Can VTreformer review a studio floor plan?
Buyers can share the usable training area, floor plan, target class size, preferred configuration and project details for equipment-selection support. Final architectural and regulatory approval remains with qualified local professionals.
Build the layout around operation, not equipment count
The best Pilates studio layout supports the service model from client arrival through class delivery, cleaning and departure. Begin with functional zones, use exact equipment dimensions and plan complete stations rather than bare footprints.
Then test circulation, sightlines, storage and daily routines at scale. A layout that leaves room for instructors, clients and operations can be more valuable than one that simply contains another reformer.
Find the Right Equipment by sharing your studio floor plan, usable training area and target class format with VTreformer.